Java Web Application for Managing an Online Store
This project is a java web application that allows my client to manage his online store.
Published on: 6/8/2024
Note
The code for this project can be found on GitHub. The code is fully documented. Some images may take a while to load on this webpage.
Functionality Video
Above is a video that shows the functionality of the application. You can click on the video to play it. Once the video starts playing you can click on the full screen button to view the video in full screen, or you can click on the youtube button to view the video on youtube. This will allow you to fix the screen size of the video.
Introduction
This is a java web application that allows my client to manage his online store. We make use of mysql database to store the data. The application is hosted on a tomcat server, whereas, the webpages are designed using JSP and servlets. The application is designed to be simple and easy to use. The client is not very good with technology, so the application is designed to be simple and easy to use. The application allows the client to store his customer details safely. The application uses JDBC to connect to the database.
The following is the success criteria for the project:
- The application allows the client to store his customer details safely.
- The application allows the client to add new information about the customers in the storage.
- The application allows the client to view all or individual information.
- The application allows the client to delete information related to a customer.
- The application makes sure that the same ID is not assigned to different customers.
- Error messages are shown whenever incorrect, or information in the wrong format is entered
- The program is simple and highly usable as the client is not very good with technology.
- Once the user is done using the program, he or she can log out.
- The application allows the client to update information about a particular customer.
- There are separate login accounts. One for the client and one for his employees.
- The account for the employee only allows for them to insert and read the data. They should not be able to update or delete the data.
Web applications built using Java and MySQL are widely used across industries because of their scalability, security, and robustness.
Background
We use apache tomcat in this project. Apache Tomcat is an open-source Java Servlet container developed by the Apache Software Foundation (ASF). Tomcat implements several Java EE specifications including Java Servlet, JavaServer Pages (JSP), Java EL, and WebSocket, and provides a "pure Java" HTTP web server environment in which Java code can run. All the pages are designed using JSP. Which is a technology that helps software developers create dynamically generated web pages by embedding java code with html.
The code below shows how we write java logic in JSP:
<% code %>
Lastly, To establish a connection between the database, we use the JDBC driver. JDBC is a Java API that is used to connect and execute query to the database. With JDBC one can send SQL queries to mysql database and get the results.
Design
Below is the flowchart that explains the design of the application:

Flowchart
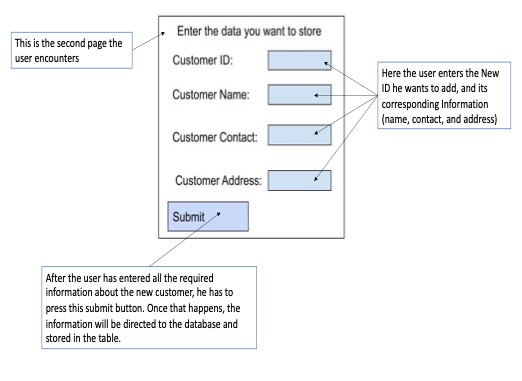
Sample mockups of the application were created, The following are the mockups:

InsertData
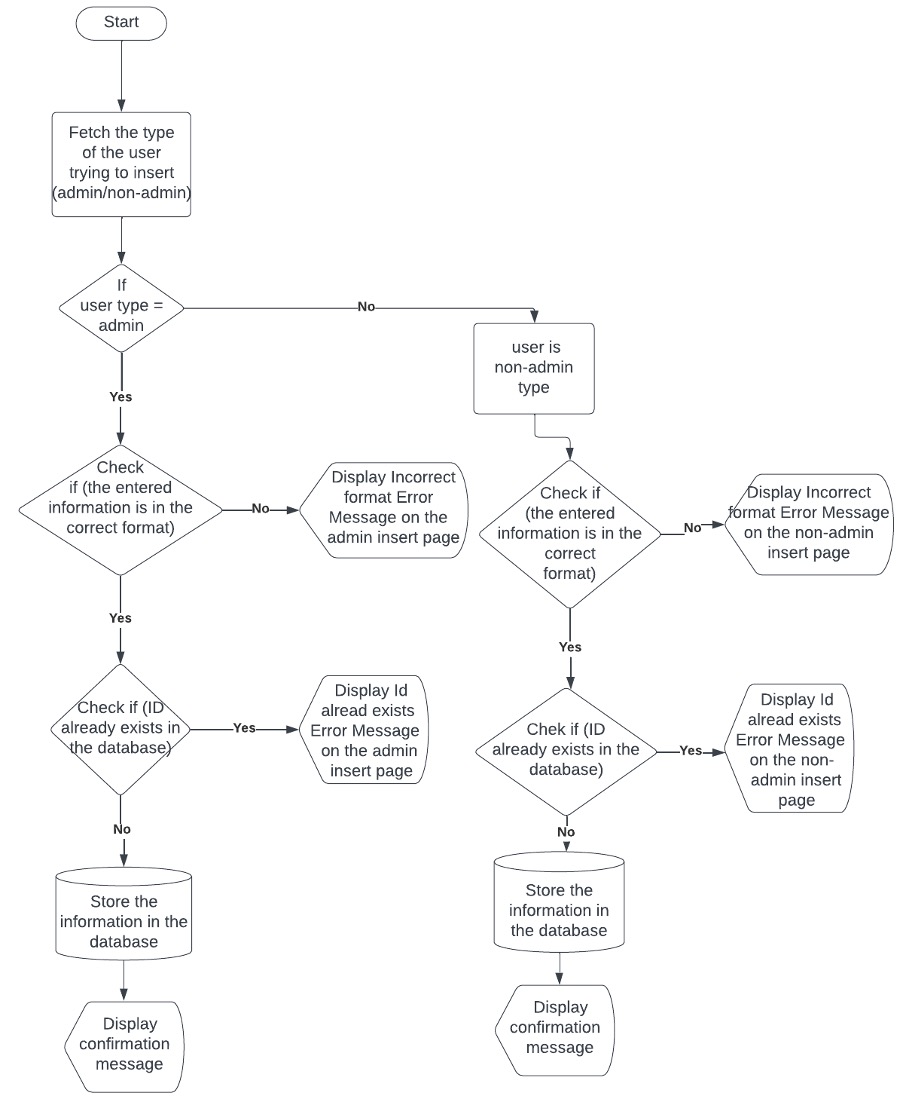
The insert data flowchart is as follows:

InsertDataFlowchart
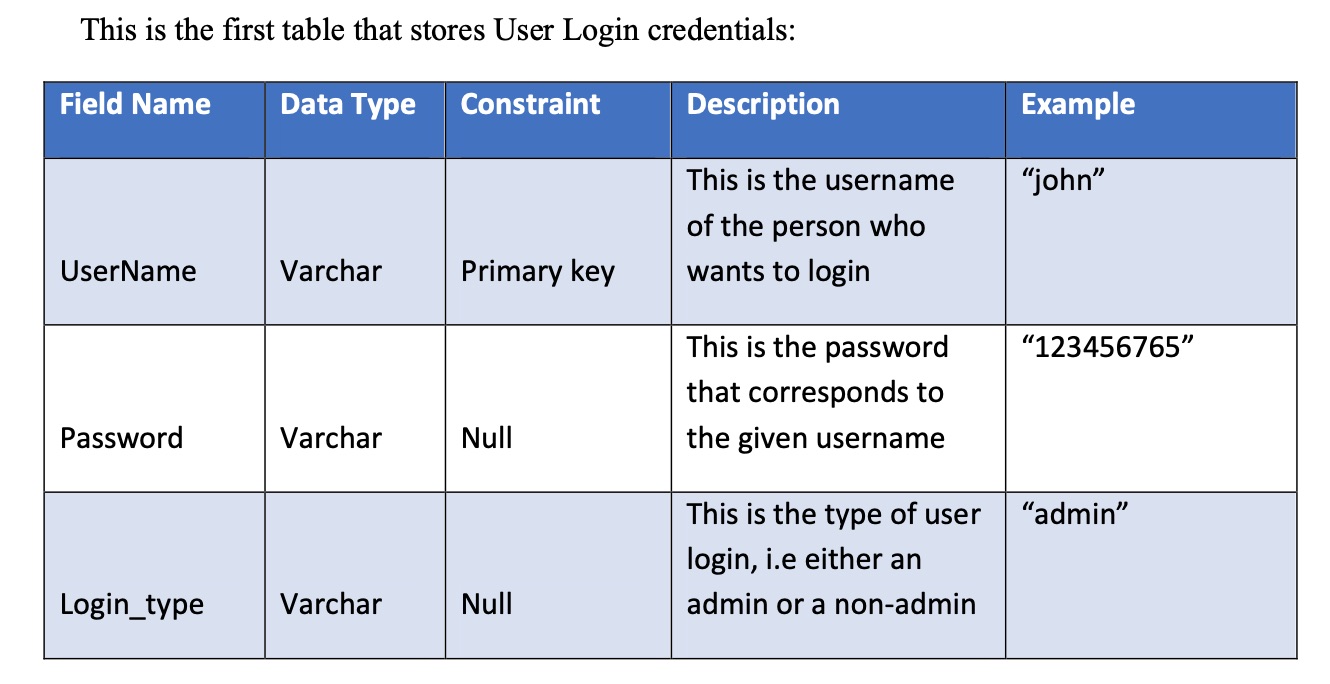
The data dictionary for the application is as follows:

DataDictionary

secondDataDictionary
Most of the the information above is self explanatory. In the attached file, you will find a detailed test plan at the end of the document.In the test plan, I have outlined the test cases that I will be using to test the application, the test data that I will be using, and the expected results. The test plan is very detailed and should be able to help you understand how the application works.
Click here to view the detailed test plan and Design
Implementation
The code is structured in the following way:
-
Controller, This folder contains all the logic for the application.
- CreateInfoController.java - This file contains the logic for creating a new customer.
- DeleteInfoController.java - This file contains the logic for deleting a customer.
- UpdateInfoController.java - This file contains the logic for updating a customer.
- ReadInfoController.java - This file contains the logic for reading a customer.
- LoginController.java - This file contains the logic for logging in.
-
webApp - This folder contains all the JSP files.
- index.jsp - This file contains the logic for the login page.
- homepage.jsp - This file contains the logic for the homepage.
- homepagenonadmin.jsp - This file contains the logic for the homepage for the employee.
- Delete.jsp - This file contains the logic for deleting a customer.
- Main.jsp - This file contains the logic to create a new customer.
- nonadmininsert.jsp - This file contains the logic to create a new customer for the employee.
- nonadminread.jsp - This file contains the logic to read a customer for the employee.
- Read.jsp - This file contains the logic to read a customer.
- Update.jsp - This file contains the logic to update a customer.
-
dao - This folder helps in connecting to the database.
Controller code
The following is some of the code from createInfoController.java:
Integer idtoadd =  Integer.parseInt(request.getParameter("Personal_id"));
String custNametoadd = request.getParameter("User_name");
String contactNumber = request.getParameter("contactNumber");
String cusaddresstoadd = request.getParameter("UserAdress");
String User_type = request.getParameter("Insert_typeuser");
This code is used to get the data from the form and store it in variables. The variables are then used to insert the data into the database.
We use the following code to connect to the database:
Connection con = DatabaseConnection.initializeDatabase();
Then we conduct a primary key check to make sure that the same ID is not assigned to different customers:
String CheckPrimaryKeyQuery =" SELECT * FROM Data_table WHERE CustomerID = ?";
PreparedStatement CheckPStmt = con.prepareStatement(CheckPrimaryKeyQuery);
// setting the variable that will replace the question mark
CheckPStmt.setInt(1, idtoadd);
ResultSet FInt = CheckPStmt.executeQuery();
First we define a SQL SELECT query that looks for a record in the Data_table where the CustomerID matches a specific value. the "?" is a placeholder for the value that we want to check. A PreparedStatement is used to execute the query, as it helps to prevent SQL injection attacks. setInt(1, idtoadd) replaces the first (and only) placeholder "?" in the query with the value of idtoadd (which represents the CustomerID the code is checking). In the end we execute the query and store the result in a ResultSet object.
if the Id is not found in the database, we insert the data into the database by running the following query:
String Createquery = "insert into Data_table (CustomerID, CustomerName, Contact, Address) values (?, ?, ?, ?)";
PreparedStatement insertpreparedstmt = con.prepareStatement(Createquery);
insertpreparedstmt.setInt(1, idtoadd);
insertpreparedstmt.setString (2, custNametoadd);
insertpreparedstmt.setString (3, contactNumber);
insertpreparedstmt.setString (4, cusaddresstoadd);
insertpreparedstmt.execute();
insertpreparedstmt.close();
con.close();
If insertion is successful, a success message is displayed:
UserInformMessage Displayed_Message_Usw = new UserInformMessage();
Displayed_Message_Usw.setMessage("Successfully inserted.");
Finally, The JDBC resources (prepared statement, connection) are closed after the database operations to free up resources.
The code for the other controllers is similar to the code above. The only major difference is the SQL query that is run.
JSP code
Following is the code for the delete.jsp file.
<%@page import="java.util.Optional" %>
<%@page import="com.testdemo.entities.UserInformMessage" %>
The above code is used to import the necessary classes.
Following is the code that is used to fetch and display session messages:
<%
UserInformMessage IncorrectInput = (UserInformMessage) session.getAttribute("Displayed_Message_Usw");
if (!Optional.ofNullable(IncorrectInput).isEmpty()) {
    String DisplayedMessage = IncorrectInput.getMessage();
%>
    <div class="alert alert-danger">
        <h2 class="popupmessage"> <%= DisplayedMessage %> </h2>
    </div>
<%
    session.removeAttribute("Displayed_Message_Usw");
}
%>
The explanation of the code is divided into 4 parts below for better understanding:
-
The UserInformMessage object (IncorrectInput) is retrieved from the HttpSession object using session.getAttribute("Displayed_Message_Usw").
-
This session attribute holds any feedback messages (like errors or success messages) set on previous pages. The Optional.ofNullable(IncorrectInput) checks if IncorrectInput is null (i.e., if there is no message to display). If it's not null, the message is displayed.
-
The DisplayedMessage string holds the actual message (retrieved by IncorrectInput.getMessage()) and is output inside a div with the class alert alert-danger (likely styled as an error message in style.css).
-
Once the message is displayed, session.removeAttribute("Displayed_Message_Usw") clears the message from the session to prevent it from being displayed again after a page reload.
The following code is used to display the form:
<form action="./DeleteData" method="post">
  <p>Enter the ID you want to delete:</p>
  <input type="number" name="DeleteID" min="0" required />
  <br /><br /><br />
  <input type="submit" class="SubmitButton" />
</form>
In this form the user is asked to enter the ID of the customer they want to delete. The form is submitted to the DeleteData servlet using the post method when the user clicks the submit button.
Lastly, the following code is used to display the navigation links:
<p>
  <a href="Read.jsp" class="urlButton">View Customer</a>
  <a href="Main.jsp" class="urlButton">Create Customer</a>
  <a href="Update.jsp" class="urlButton">Update Customer</a>
  <a href="homepage.jsp" class="urlButton">Homepage</a>
</p>
<br />
<p>
  <a href="index.jsp" class="urlButton">LogOut</a>
</p>
The only thing that needs to be explained is how the jsp is stitched together with the controller. This is done in the web.xml file, in the WEB-INF folder in webapp. The following is a code snippet from the web.xml file:
<servlet>
    <servlet-name>DeleteInfoController</servlet-name>
    <servlet-class>com.testdemo.controller.DeleteInfoController</servlet-class>
</servlet>
The
<servlet-mapping>
    <servlet-name>DeleteInfoController</servlet-name>
    <url-pattern>/DeleteData</url-pattern>
</servlet-mapping>
This code snippet maps the DeleteInfoController servlet to the /DeleteData URL pattern. This means that when a user navigates to the /DeleteData URL, the DeleteInfoController servlet will handle the request.
Testing and Evaluation
The video above shows the testing of the application.